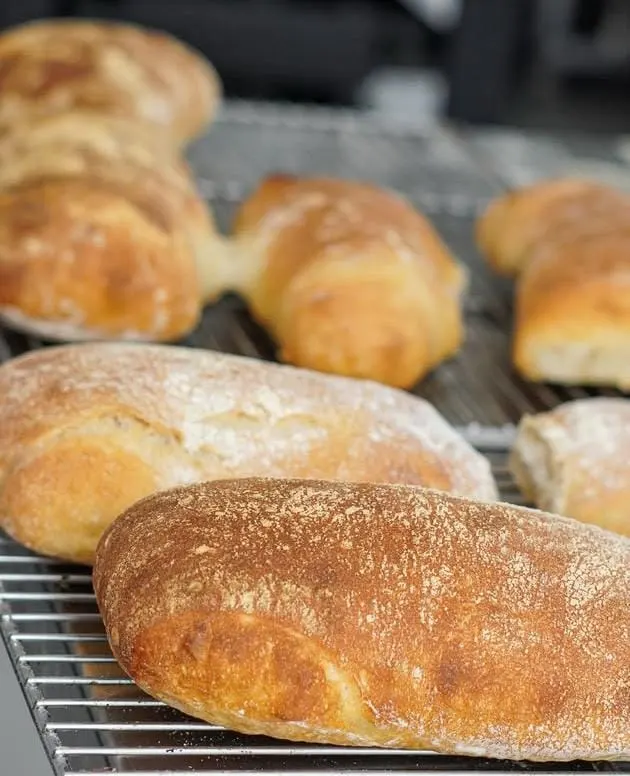
Artisan Easy Ciabatta Bread Recipe – Crusty No-Knead Loaf for Sandwiches & Rustic Baking
Ciabatta is a classic Italian bread known for its thin, crisp crust, open airy crumb, and slightly chewy texture. Developed in the 1980s as a response to French baguettes, ciabatta has become a global favorite for sandwiches, bruschetta, and rustic meals. Making ciabatta at home allows you to control ingredients, avoid preservatives, and enjoy a fresh loaf with the characteristic holes and olive oil flavor.
This recipe focuses on a reliable, easy approach that produces an authentic ciabatta using a simple starter and minimal handling to preserve the open crumb. Whether you are a beginner baker or an advanced home baker, you will find clear steps and tips to achieve bakery-quality results in your kitchen.

Also read: 20 Zero Calorie Foods for Weight Loss
Nutritional Highlights
Ciabatta is primarily a source of carbohydrates from wheat flour, providing quick energy and a satisfying base for balanced meals. A standard 100 g portion of ciabatta yields about 250–300 calories, depending on hydration and exact ingredients. Whole grain variants increase fiber, B vitamins and minerals such as iron and magnesium.
Olive oil, commonly used in ciabatta dough and as a finish, contributes monounsaturated fats and vitamin E. While ciabatta is a treat rather than a health food, moderation and pairing it with vegetables, lean proteins, and healthy fats makes it part of a balanced diet. For those managing blood sugar, combining bread with protein and fiber slows glucose absorption.

Also read: 20 Delicious Keto Diet Recipes
Main Ingredients (Yields 2 Loaves)
Below are exact ingredient quantities for making two medium ciabatta loaves:

- 700 grams (5 1/2 cups) bread flour (high-protein, 12–13% protein)
- 500 grams (2 1/8 cups) water at room temperature (about 20–22°C / 68–72°F)
- 14 grams (1 tablespoon) fine sea salt
- 7 grams (1 packet / 2 1/4 teaspoons) active dry yeast
- 30 grams (2 tablespoons) extra virgin olive oil
- 20 grams (1 1/2 tablespoons) sugar or honey (optional, helps fermentation)
- Cornmeal or semolina for dusting the baking surface
Ingredient Roles and Why They Matter

Bread flour gives the structure and protein necessary for gluten development, which supports the open crumb of ciabatta. Water percentage is high in ciabatta and creates a wet, sticky dough; this high hydration is what forms the characteristic irregular holes. Salt strengthens gluten and controls yeast activity; it also seasons the loaf.
Yeast provides the leavening and flavor through fermentation; active dry yeast is convenient and predictable, though instant yeast or a sourdough starter can be used as variations. Olive oil tenderizes the crumb slightly and complements the Italian flavor profile. Sugar or honey is optional and gives the yeast an accessible food source early on, accelerating rise in cooler kitchens. Cornmeal or semolina prevents sticking and adds a rustic base to the loaves.
Equipment Needed
You will need a large mixing bowl, a sturdy spoon or dough scraper, a kitchen scale for accurate measurement, a proofing container or covered bowl, a rimmed baking sheet or baking stone, parchment paper, and a sharp lame or serrated knife for scoring.
A Dutch oven can be used for producing steam but ciabatta traditionally bakes on a hot stone or sheet with steam introduced separately. An instant-read thermometer is helpful but not essential for determining doneness (internal temperature target is approximately 98–100°C / 208–212°F).
How to Prepare Ciabatta Bread Recipe – Step-by-Step
Step 1: Measure, Combine, and Autolyse
Begin by weighing your flour and water precisely with a kitchen scale. Mix the 700 grams of bread flour with 500 grams of water in a large bowl until no dry flour remains; the dough will be very shaggy and sticky. Cover and let it rest for 20–30 minutes. This resting phase, called autolyse, hydrates the flour and begins gluten formation without mechanical mixing, improving extensibility which is crucial for an open ciabatta crumb.
Step 2: Add Yeast, Salt, and Olive Oil
After the autolyse, sprinkle the yeast and sugar (if using) over the dough and add the salt and olive oil. Mix thoroughly by folding and pressing the dough with a wet hand or dough scraper until ingredients are incorporated. The dough is extremely sticky; resist the urge to add extra flour. Instead, rely on later folds to build strength. A wet hand helps manage the tacky mass while ensuring even distribution.
Step 3: Bulk Fermentation with Stretch and Folds
Transfer the dough to a clean, lightly oiled bowl for bulk fermentation. Perform a series of stretch-and-fold motions every 20–30 minutes for the first 2 hours—lift one side of the dough and fold it over the center, rotating the bowl. This gentle manipulation builds gluten without aggressive kneading. Maintain the dough at about 24°C (75°F) for the best activity; if your kitchen is cool, extend fermentation times.
Step 4: Shape Gently and Preproof
After the bulk rise, gently turn the dough onto a well-floured surface and divide it into two equal portions with a bench scraper. Handle the dough delicately to preserve gas bubbles. Shape each portion into a rough rectangle by folding the edges under—do not degas. Place each shaped loaf on parchment dusted with semolina or cornmeal. Cover loosely and let them rest for 30–45 minutes for the final proof.
Step 5: Preheat Oven and Prepare Steam
While the dough proofs, preheat your oven to 250°C (482°F) with a baking stone or heavy sheet inside to accumulate heat. If you have a steam pan, place a metal roasting pan on the bottom rack; you will add hot water to create steam. Alternatively, use a Dutch oven or introduce steam by spraying water onto the oven walls just after placing the loaves in.
Step 6: Bake with Steam for Crispy Crust
Slide the parchment with loaves onto the preheated stone, then quickly add a cup of boiling water to the pan to generate steam and close the oven. Bake at 250°C (482°F) for the first 10 minutes with steam, then reduce to 220°C (428°F) and bake for 18–22 minutes until the crust is deep golden and the loaf sounds hollow when tapped. Internal temperature should reach about 98–100°C (208–212°F). Remove from oven and cool completely on a wire rack before slicing.

Healthy Habits and Serving Suggestions
Enjoy ciabatta as the foundation for balanced meals: pair a slice with lean proteins like grilled chicken or fish and a generous portion of vegetables. To increase fiber and nutrients, make half the flour whole wheat or use a mix of bread and whole-wheat flours (reduce hydration slightly). Use olive oil-rich toppings such as bruschetta with tomatoes and basil instead of butter to add healthy fats. Control portions—two small slices with a salad make a satisfying, moderate meal. Baking at home encourages mindful eating and awareness of ingredients.
Variations
1. Classic Olive and Rosemary Ciabatta

For a Mediterranean twist, fold in 100 g chopped pitted olives and 2 tablespoons finely chopped fresh rosemary during the final stretch-and-fold phase. The olives provide briny pockets of flavor while rosemary adds aromatic depth. Shape and bake as directed; the added inclusions make a beautiful rustic loaf ideal for pairing with cheeses or tapas.
This version is especially good brushed lightly with olive oil immediately after baking and sprinkled with sea salt for shine and flavor. Serve thin slices with olive oil dipping sauce or alongside grilled vegetables. The olives increase moisture locally so monitor bake time; you may need a couple extra minutes on the stone. It stores well but is best eaten within two days for optimal texture.
2. Whole Wheat Seeded Ciabatta

Replace 200 g of the bread flour with whole-wheat flour and fold in 80 g mixed seeds (sunflower, pumpkin, flax) during shaping for extra nutrition and texture. The whole wheat will absorb more water, so you may need to increase hydration by 20–30 g. The seeds toast in the oven, adding nutty flavor and enriching the crumb. This loaf is hearty and pairs well with heartier sandwiches and spreads.
To maintain an open crumb, perform gentle folds and avoid overworking the dough. The whole-wheat loaf benefits from a slightly longer bulk fermentation to develop flavor. Brush seeds with olive oil before baking to encourage browning. Store in a paper bag for up to 48 hours; freeze for longer storage.
3. Garlic-Herb Butter Ciabatta (Slab Pan)

After baking a plain ciabatta, slice it horizontally and spread a compound butter made from 60 g softened butter, 2 cloves minced garlic, and 1 tablespoon chopped parsley. Return under the broiler briefly to melt and brown the butter, creating a garlic bread that is indulgent yet simple. This variation transforms ciabatta into a party favorite.
To make a healthier version, use olive oil blended with garlic and herbs as a lighter spread. For gatherings, cut into finger-friendly pieces and serve warm. The broiler method adds crispness to the surface while keeping the interior tender. It’s an excellent accompaniment to soups and salads.
4. Sourdough Ciabatta (Using Starter)

Substitute the commercial yeast with 150 g active sourdough starter (100% hydration) and reduce added water by 100 g. Combine starter during the mixing phase and extend bulk fermentation to 6–8 hours depending on starter strength and temperature. Sourdough adds tangy complexity and longer shelf life due to acidity. Follow shaping and baking directions with attention to proof timing.
Sourdough ciabatta rewards patience; its flavor deepens with cold retardation in the fridge overnight. For best results, bake from cool-proofed dough but allow 20–30 minutes at room temperature before loading. The crust may brown differently due to organic acids; watch carefully during the final bake. This loaf makes spectacular sandwiches with robust fillings.
5. Olive Oil and Honey Breakfast Ciabatta
For a breakfast-inspired loaf, add 20 g honey to the dough and brush the warm loaf with a mix of 15 g olive oil and 5 g honey after baking for a sweet crust sheen. Honey enhances browning and adds a gentle sweetness that pairs beautifully with toppings like ricotta. Keep hydration the same; honey is liquid so it integrates smoothly.
This sweeter ciabatta works well sliced and toasted with fruit or nut butter. For savory-sweet pairings, top with prosciutto and melon or a smear of ricotta and lemon zest. Store wrapped once cooled to preserve softness, and refresh in a toaster or oven before serving.
Troubleshooting and Common Pitfalls
Sticky dough handling can intimidate bakers; the right response is to use wet hands and a bench scraper rather than adding extra flour. Over-kneading is unlikely with this method; instead focus on timed stretch-and-folds to develop structure.
If your loaves spread too much, your final proof may have been overlong—shorten the proof and try again. If crumb is too tight, increase hydration slightly or lengthen the bulk fermentation to allow more gas expansion. Uneven browning can be due to uneven oven heat—rotate pans and use a baking stone for more consistent results. Always cool completely before slicing to set the crumb and improve texture.
Storage, Freezing and Reheating Tips
To store ciabatta, cool completely then place in a paper bag at room temperature for 1–2 days. For longer storage, slice and freeze in freezer bags for up to three months. Reheat from frozen by toasting slices or warming whole loaves in a 180°C (350°F) oven for 10–15 minutes wrapped in foil, or 5–7 minutes unwrapped for a crisper crust.
Avoid microwaving which makes the crumb gummy. Refreshing in the oven restores the crust and breathes life back into frozen loaves. For best flavor, consume within three months of freezing.
Final Thoughts and Encouragement
Ciabatta baking rewards patience and attention to technique more than complex ingredients. Once you master the high-hydration handling and gentle shaping, you can produce bakery-level loaves at home repeatedly.
Experiment with variations, use high-quality flour and olive oil, and keep notes on times and temperatures that work in your kitchen. Each oven and climate requires slight adjustments—embrace the learning process and enjoy the sensory delight of fresh bread. Sharing homemade ciabatta is a simple way to elevate everyday meals and celebrate the pleasure of baking.
A Short History of Ciabatta
Ciabatta’s modern origin dates to northern Italy in the early 1980s when a baker created a new bread to compete with French baguettes while remaining distinctly Italian. The term ciabatta means ‘slipper’ in Italian, a playful nod to the loaf’s flat, elongated shape. Early recipes emphasized high hydration and strong flour to produce an airy, holey crumb unlike many traditional denser Italian breads.
Over a few decades, ciabatta moved from artisanal bakeries into commercial bakeries and home kitchens, adapted to local flours and ovens, and now enjoys global popularity as a sandwich bread and rustic table loaf. Understanding its history helps bakers appreciate the balance of texture, hydration, and technique that defines authentic ciabatta.
The Science of High Hydration Doughs
High hydration doughs—those with water levels above 65% relative to flour weight—behave differently from low-hydration doughs. Water hydrates starches and proteins, encourages enzymatic activity, and creates a fluid matrix in which gas bubbles can expand freely. The result is the open crumb that defines ciabatta.
High hydration also makes the dough sticky and hard to handle; therefore, gentle folds and minimal degassing are critical. During fermentation, yeast produces carbon dioxide and alcohol; the gluten network traps bubbles and strengthens through time and temperature. A common tip is to rely on time rather than aggressive mixing to develop structure.
The autolyse step helps by allowing enzymes to begin gluten formation and sugar release before salt and yeast are added. This is why many bakers prefer an autolyse followed by stretch-and-folds rather than heavy kneading.
Preferments: Poolish or Biga for Extra Flavor
For deeper flavor and improved loaf volume, consider using a preferment such as poolish or biga. A poolish is a wet preferment made with equal parts water and flour by weight and a tiny pinch of yeast; it ferments for 12–16 hours at room temperature, developing complex flavors and acidity.
A biga is stiffer with less water and a longer, slower fermentation that offers chew and subtle tang. To use a poolish in this recipe, mix 200 g flour, 200 g water, and 0.25 g (a pinch) yeast the night before; in the morning add it to the main dough and reduce hydration accordingly. Preferments contribute aroma, strengthen the gluten network, and improve shelf life without changing the fundamental ciabatta characteristics.
Detailed Timeline and Time-Saving Tips
This ciabatta recipe can be adapted to fit busy schedules. A typical timeline looks like this: day one, mix and autolyse for 20–30 minutes, then add yeast and salt and perform stretch-and-folds over two hours; shape and proof for 30–45 minutes and bake.
In cooler weather, lengthen bulk fermentation or use a slightly warmer proofing spot. For an overnight approach, perform the bulk fermentation for 2 hours at room temperature then refrigerate the dough for 8–14 hours; the cold retardation develops flavor and allows you to bake fresh bread in the morning.
When retarding dough, allow it to warm for 1–2 hours before shaping so the yeast reactivates. Time-saving tip: use a stand mixer to combine ingredients during the initial mixing if you prefer, but still rely on fold intervals rather than long continuous mixing to preserve hydration benefits.
Sandwich and Serving Ideas
Ciabatta is a sandwich baker’s delight. Try a classic Caprese sandwich with sliced fresh mozzarella, heirloom tomatoes, fresh basil, a drizzle of extra virgin olive oil and balsamic glaze on toasted ciabatta. For a heartier option, make a porchetta-style sandwich with thinly sliced roasted pork, sautéed greens and a smear of mustard.
Vegetarian lovers will enjoy grilled vegetables, roasted red pepper spread, and goat cheese. For brunch, top toasted ciabatta with smashed avocado, lemon, chili flakes and a sprinkle of sea salt. Use leftover ciabatta to make croutons, panzanella salad, or a rustic bread pudding—its porosity soaks up dressings and custards beautifully.
Frequently Asked Questions (FAQ)
Q: Can I use all-purpose flour?
A: Yes, you can, but the crumb will be slightly less open. Bread flour with higher protein supports larger holes.
Q: What if my dough is too sticky to handle?
A: Use a wet hand or a dough scraper and avoid adding flour; perform more folds instead to build strength.
Q: How do I know when ciabatta is fully baked?
A: Tap the bottom—if it sounds hollow—and check the internal temperature near 98–100°C (208–212°F) it’s done.
Q: Can I make mini ciabatta rolls?
A: Yes—divide dough into more pieces and shorten baking time; mini loaves are perfect for sliders.
Q: Why are the holes in my bread small?
A: Likely due to under-hydration, over-handling during shaping, or too short a bulk fermentation; increase hydration or lengthen fermentation next time.
Glossary of Terms
Autolyse: A rest period after mixing flour and water that hydrates flour and aids gluten formation.
Bulk Fermentation: The main rise of the dough where yeast produces gas and flavor develops.
Stretch-and-Fold: A gentle technique to strengthen dough by folding it over itself.
Hydration: The ratio of water to flour by weight; ciabatta is high hydration.
Retardation: Cold fermentation in the refrigerator to develop flavor slowly.
Metric and US Measurement Quick Reference
700 g bread flour = about 5 1/2 cups
500 g water = about 2 1/8 cups
14 g salt = 1 tablespoon
7 g active dry yeast = 1 packet (2 1/4 teaspoons)
30 g olive oil = 2 tablespoons
Inspiration and Next Steps
Once you are comfortable with the basic technique, experiment with hydration percentages, different flours, and inclusions. Keep a baking journal: note room temperature, times of folds and proof lengths, and how the loaf looks and tastes. Baking is part technique and part adaptation to your environment; each successful loaf builds confidence. Share your bread with neighbors and friends—fresh loaves create joy and encourage continued practice.
Advanced Flavor Add-Ins and Quick Recipes
Enhance your ciabatta with simple add-ins and toppings that transform the loaf into a versatile platform. Try adding 80–100 g chopped sun-dried tomatoes and 50 g crumbled feta folded gently into the dough during the final stretch; this creates a Mediterranean loaf rich in umami.
For an herbed oil, warm 60 ml olive oil with a sprig of rosemary, a crushed garlic clove, and a pinch of chili flakes; brush over warm slices for a fragrant finish. A quick bruschetta uses diced tomatoes, minced garlic, chopped basil, olive oil, and a pinch of salt—spoon over toasted ciabatta for an instant appetizer.
These small additions are easiest when mixed into the dough sparingly so they do not weigh down the structure. When adding wet ingredients like pesto or marinated vegetables, fold them in during shaping and accept slight changes in texture.