Easy Homemade Pita Pocket Recipes: Healthy, Delicious, and Perfect for Every Meal
Pita pockets are one of the most versatile and satisfying foods you can make at home. Known for their soft yet slightly chewy texture and signature hollow center, these round flatbreads can be filled with a wide variety of ingredients to create everything from healthy lunches to hearty dinners. Across Pinterest and other food platforms, “pita pocket recipes” are trending because people are constantly searching for convenient, customizable, and healthy meals. Whether you want a plant-based option, a high-protein filling, or even a dessert twist, pita bread can be adapted to suit nearly any craving.
One of the reasons pita pockets remain so popular is their balance between being simple to prepare yet incredibly versatile to serve. At its core, pita is a type of flatbread that puffs up during baking, creating a pocket that can be stuffed with your favorite fillings. From falafel and hummus to grilled chicken or roasted vegetables, the options are endless. They are also easy to meal prep in advance, making them a top choice for busy families, students, or anyone looking for a quick but nourishing dish.
Also Read: Crispy Smashed Red Potatoes Recipe
Main Ingredients for Pita Pockets

1. All-Purpose Flour or Bread Flour
Flour is the foundation of pita bread. All-purpose flour works well for softer pitas, while bread flour (with its higher protein content) creates more structure and chewiness. The gluten in the flour is what allows the dough to trap air bubbles, which are crucial for forming the signature pocket inside. If you want a healthier version, you can substitute part of the flour with whole wheat flour, which adds fiber and a nutty flavor. However, too much whole wheat can make the bread denser, so a balance is best.
2. Yeast
Yeast is the ingredient responsible for making the dough rise. It ferments the natural sugars in the flour, producing carbon dioxide that helps the dough expand and develop a light, airy texture. Active dry yeast or instant yeast both work well, though instant yeast often requires less proofing time. Fresh yeast is also an option if available, giving a slightly different flavor profile. Without yeast, your pita bread would be flat and dense, missing the characteristic pocket that makes it unique.
3. Warm Water
Water activates the yeast and helps hydrate the flour, forming gluten strands that give structure to the dough. It’s important that the water is warm but not hot—ideally around 100–110°F (37–43°C). Too hot, and you risk killing the yeast; too cold, and the yeast won’t activate properly. The right water temperature ensures your dough rises steadily and evenly.
4. Olive Oil
Olive oil enriches the dough, making it softer and adding subtle flavor. It also helps the pita stay moist after baking, preventing it from becoming too dry. While you can use other oils, olive oil is the traditional choice because of its Mediterranean origins. Besides improving texture, olive oil also helps extend the shelf life of your pita bread by keeping it tender for longer.
5. Salt
Salt may seem minor, but it plays a critical role in enhancing flavor and controlling yeast activity. Too little salt will make your bread bland, while too much can slow down fermentation. It strengthens the gluten structure as well, ensuring your dough is elastic enough to trap steam during baking, which is what creates the pocket. Sea salt or kosher salt both work beautifully.
6. Sugar or Honey (Optional)
A small amount of sugar or honey can be added to the dough to give a subtle sweetness and to help feed the yeast for a quicker rise. While not strictly necessary, it adds depth of flavor and can improve browning during baking. If you want to keep your pita on the savory side, you can skip this, but many bakers prefer just a teaspoon or two for balance.
7. Additional Fillings and Toppings
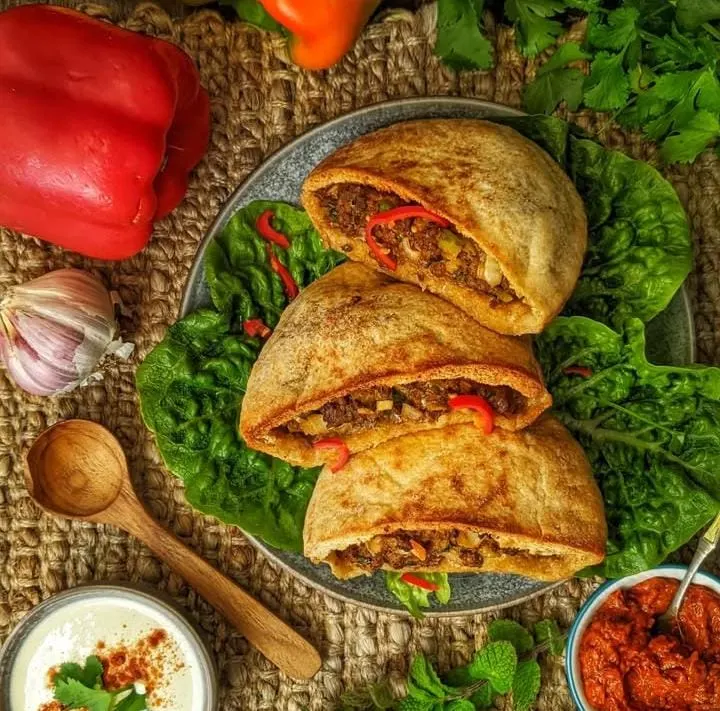
While the base ingredients are simple, pita pockets are most exciting when filled. Typical fillings include proteins like chicken, beef, lamb, tuna, or falafel, paired with fresh vegetables such as lettuce, cucumbers, and tomatoes. Sauces like hummus, tzatziki, garlic mayo, or tahini bring everything together. Each combination transforms the pita into a whole new meal, which is why it’s considered one of the most customizable dishes in the world.
Step-by-Step Preparation of Homemade Pita Pockets
Step 1: Mixing the Dough
To begin making homemade pita bread, you’ll first need to combine the dry ingredients. In a large mixing bowl, add the flour, yeast, salt, and optional sugar or honey if you want a touch of sweetness. Stir them lightly to ensure even distribution before adding liquids. Next, slowly pour in the warm water along with olive oil. Use a wooden spoon or your hands to start bringing the mixture together until a shaggy dough forms. This step is important because it ensures all the flour gets hydrated evenly, preventing dry spots that can weaken the dough later. The mixture at this stage will look rough, but don’t worry—kneading will smooth it out.
Step 2: Kneading for Structure
Kneading is one of the most crucial steps in pita-making because it develops gluten, the protein structure that allows the bread to stretch and puff up. Place the dough on a lightly floured surface and knead it by pushing the dough away with the heel of your hand, folding it back, and repeating the process. This should take about 8–10 minutes until the dough becomes smooth and elastic. If you press it with your finger and it springs back slowly, it’s ready. Proper kneading ensures the dough can trap steam while baking, creating the airy pocket inside the bread.
Step 3: First Rise (Proofing the Dough)
Once kneaded, place the dough into a lightly oiled bowl and cover it with a clean kitchen towel or plastic wrap. Allow it to rise in a warm, draft-free place for about 1–2 hours, or until it doubles in size. This stage is called proofing, and it gives the yeast time to produce gas, making the dough airy and flavorful. Be patient during this step because rushing can lead to dense bread. If your kitchen is cool, place the bowl near a warm oven or wrap it in a towel to maintain steady warmth.
Step 4: Dividing and Shaping the Dough
After the dough has risen, punch it down gently to release excess gas. Transfer it to a floured surface and divide it into equal portions—usually 8 pieces for medium-sized pita pockets. Roll each portion into a ball, then flatten it into a disc about ¼ inch thick using a rolling pin. Uniform thickness is important here; if one side is too thick, it may not puff properly in the oven. Lightly dust the discs with flour and cover them with a towel while you work to keep them from drying out.
Step 5: Second Resting Period
Before baking, let the shaped discs rest for 15–20 minutes under a kitchen towel. This second resting period allows the gluten to relax, making the dough easier to puff and rise evenly in the oven. Skipping this step often results in uneven or flat pita bread. During this time, preheat your oven to 475°F (245°C) and place a baking stone or heavy sheet pan inside to heat. The high temperature and hot surface are key to creating steam, which forms the pocket.
Step 6: Baking the Pitas
Now it’s time to bake. Place the dough discs carefully onto the preheated baking stone or sheet pan. Bake for about 3–5 minutes until the pitas puff up dramatically and turn lightly golden on the surface. The puffing is caused by steam trapped inside, which creates the hollow pocket. If some don’t puff completely, they will still be soft and delicious, perfect for dipping or using as flatbread. Keep an eye on them closely, as baking happens very quickly at this temperature.
Step 7: Cooling and Storing
Once baked, transfer the pita breads to a cooling rack and cover them with a clean kitchen towel to keep them soft as they cool. This helps prevent them from becoming too crisp or brittle. Fresh pita is best enjoyed warm, but it can also be stored in an airtight container for up to three days at room temperature. For longer storage, freeze the pitas in a sealed bag with parchment paper between each to prevent sticking. Simply reheat them in the oven or toaster before serving.
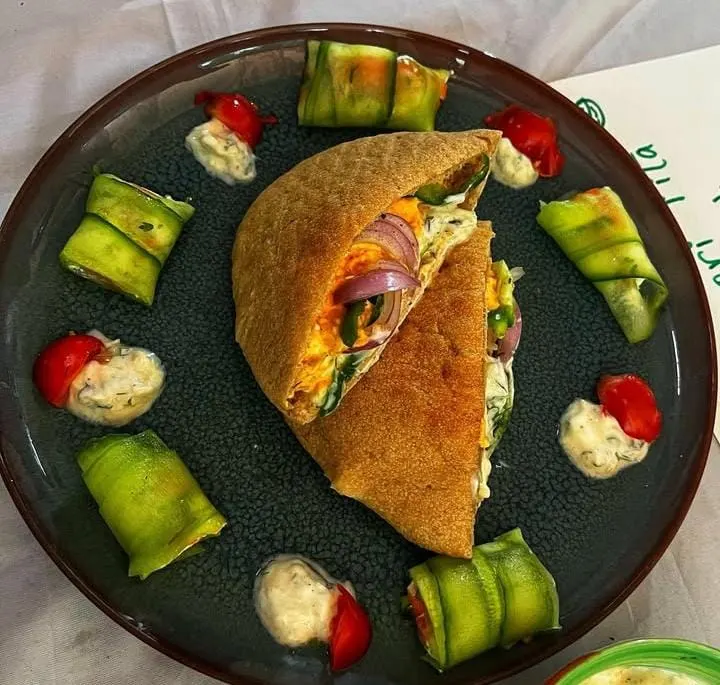
Step 8: Filling and Serving
The beauty of pita pockets lies in their versatility. Once cooled slightly, slice each pita in half and gently open the pocket. You can now fill them with your favorite ingredients—anything from grilled meats and fresh vegetables to creamy dips like hummus or tzatziki. Because the bread itself is neutral in flavor, it pairs well with savory, spicy, or even sweet fillings. Serve them as sandwiches, wraps, or even stuffed appetizers at gatherings. Each bite combines the fluffy bread with flavorful fillings, making pita pockets a universal favorite.
Variations of Pita Pocket Recipes
1. Classic Chicken Shawarma Pita Pocket
The chicken shawarma pita pocket is one of the most popular variations, combining warm spices with tender meat. To make it, marinate thinly sliced chicken in a mixture of yogurt, garlic, cumin, paprika, turmeric, and lemon juice for several hours. This allows the meat to absorb the flavors fully, resulting in juicy and aromatic chicken. Grill or pan-fry the marinated pieces until golden brown and slightly charred, giving them that authentic Middle Eastern taste.
Once the chicken is cooked, slice it into smaller strips and tuck it inside a warm pita pocket. Add accompaniments like shredded lettuce, diced tomatoes, sliced onions, and a drizzle of garlic sauce or tahini. The crisp vegetables balance the richness of the chicken while the creamy sauce ties the flavors together. This variation is hearty enough for a full meal yet light enough to enjoy on a busy weeknight.
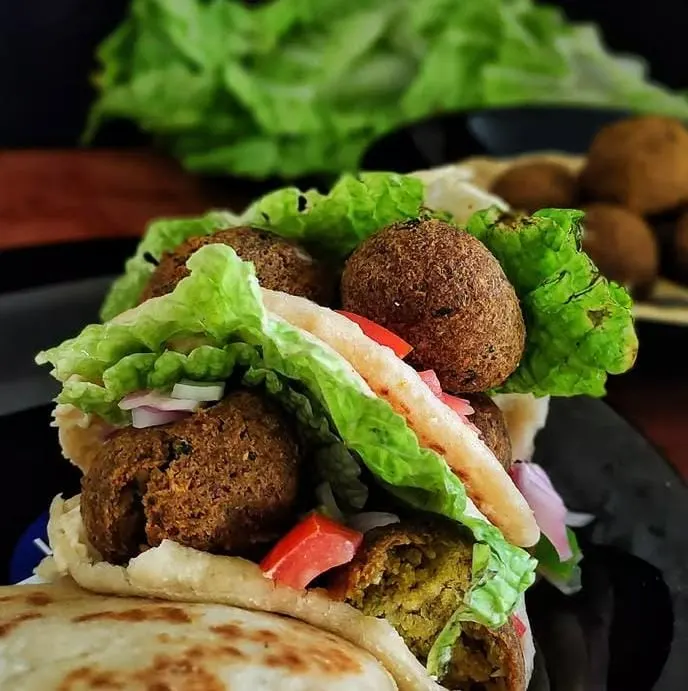
2. Mediterranean Falafel Pita Pocket
For a plant-based option, falafel pita pockets are a wholesome and flavorful choice. Start by soaking dried chickpeas overnight and blending them with fresh parsley, cilantro, garlic, onion, cumin, and coriander to create a coarse paste. Shape the mixture into small balls or patties, then fry them until golden brown and crispy on the outside while staying tender inside. Falafel brings protein, fiber, and a nutty taste that pairs beautifully with pita bread.

Fill a pita pocket with two or three falafel pieces, adding crunchy cucumbers, juicy tomatoes, and shredded lettuce. To enhance the flavor, drizzle tahini sauce or creamy hummus over the filling. You can also include pickled vegetables for an extra tang. This recipe is not only satisfying but also vegan-friendly, making it a versatile choice for family meals or gatherings where dietary preferences vary.
3. Grilled Veggie and Hummus Pita Pocket
If you’re looking for a lighter and colorful variation, a grilled veggie and hummus pita pocket is the perfect option. Start by preparing vegetables such as zucchini, bell peppers, eggplant, and onions. Brush them with olive oil, season with salt and pepper, and grill until tender with slightly charred edges. The grilling process caramelizes the natural sugars in the vegetables, enhancing their sweetness and smokiness.
To assemble, spread a generous layer of hummus inside the pita pocket and then layer in the grilled vegetables. The creamy hummus acts as both a flavor enhancer and a binder, holding the veggies in place. You can also sprinkle crumbled feta cheese or add a few fresh herbs like parsley or mint for brightness. This variation makes a wonderful light lunch or a side dish that pairs well with soups and salads.
4. Tuna Salad Pita Pocket
A tuna salad pita pocket is a simple yet satisfying option, ideal for quick lunches. Begin by mixing canned tuna with mayonnaise, diced celery, chopped onions, and a squeeze of lemon juice. The lemon brightens the flavors while the mayonnaise provides creaminess. For added nutrition and crunch, you can also include diced pickles, shredded carrots, or even sweet corn. This filling is protein-packed and can be made ahead of time for convenience.
Once the tuna mixture is ready, spoon it into a halved pita pocket and add crisp lettuce or spinach leaves for freshness. Some people also like to include sliced boiled eggs for extra richness and heartiness. The pita bread holds the mixture perfectly without becoming soggy, making it easy to eat on the go. This variation is especially popular for school lunches, office meals, or as a quick, no-fuss dinner option.
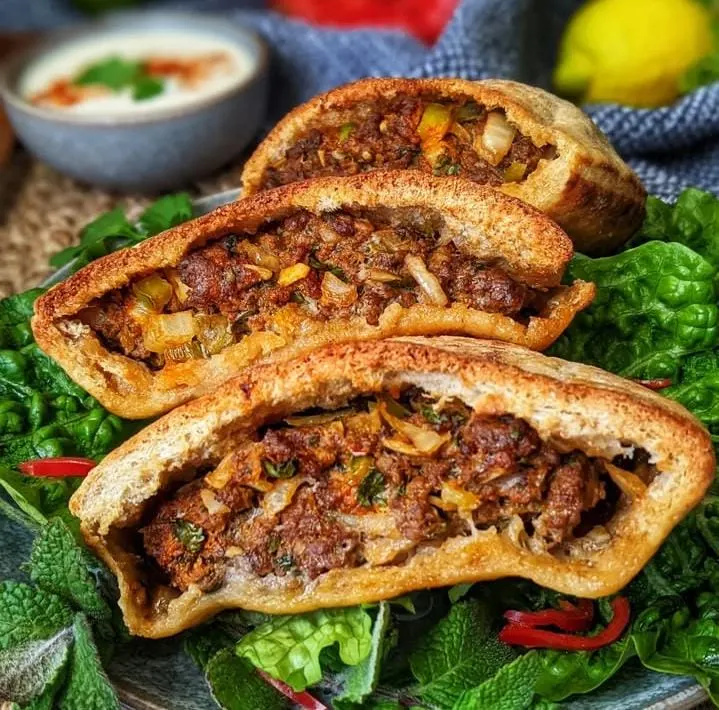
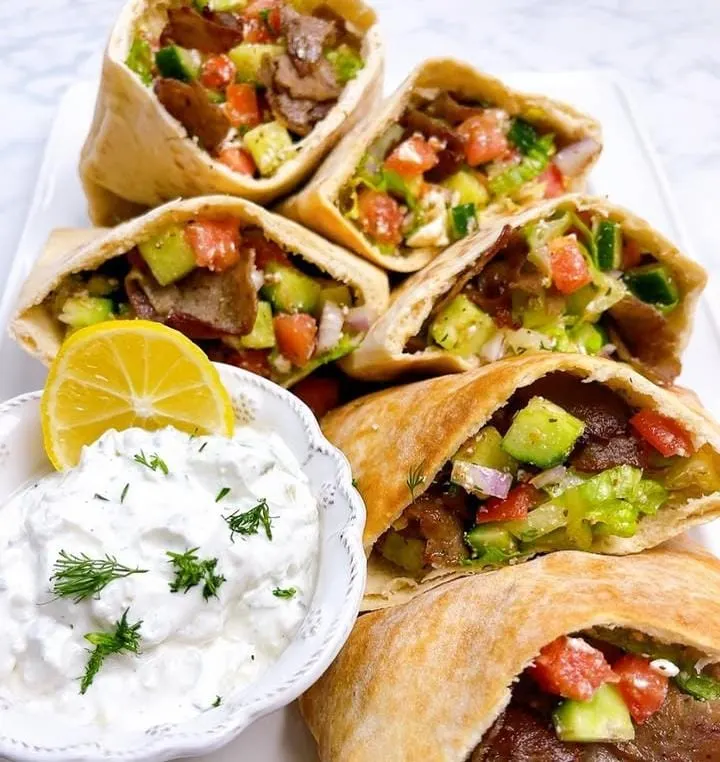
5. Greek Gyro Pita Pocket
A gyro pita pocket is a Greek classic that combines savory meat with fresh toppings. Traditionally, gyro meat is made from lamb or beef that’s seasoned with garlic, oregano, thyme, and onion before being cooked on a vertical spit. At home, you can replicate this by marinating strips of meat and cooking them in a skillet until browned. The seasoning blend is what gives gyro its signature Mediterranean flavor that pairs perfectly with pita bread.
Once the meat is ready, place it inside a warm pita pocket and top it with sliced tomatoes, onions, and plenty of tzatziki sauce. The sauce, made from yogurt, cucumber, garlic, and dill, adds creaminess and freshness to every bite. For extra authenticity, you can also sprinkle in some crumbled feta cheese or olives. This hearty and flavorful pocket is filling enough for dinner yet still light and refreshing.
6. Spicy Buffalo Chicken Pita Pocket
For those who enjoy bold flavors, a spicy buffalo chicken pita pocket is an irresistible variation. Start by cooking shredded chicken and tossing it in buffalo sauce made from hot sauce, butter, and a dash of vinegar. The result is tangy, spicy, and perfectly coated chicken with just the right amount of heat. This filling can be made in advance and reheated, making it great for quick meals or entertaining.
Stuff the buffalo chicken into a pita pocket and balance the spice with cool, crisp toppings like lettuce, celery, and shredded carrots. To add creaminess, drizzle ranch or blue cheese dressing over the filling. The combination of spicy heat and cooling toppings makes this pita pocket flavorful and satisfying without being overwhelming. It’s a great choice for game-day snacks, casual dinners, or when you want something indulgent but easy.
7. Breakfast Egg and Veggie Pita Pocket
Pita pockets aren’t just for lunch and dinner—they also make a fantastic breakfast option. Start by scrambling eggs with diced bell peppers, onions, and mushrooms. Add shredded cheese to the mix, letting it melt into the eggs for a creamy texture. This warm and hearty filling can be cooked quickly, making it ideal for busy mornings when you still want something nutritious and filling.
Spoon the scrambled mixture into a pita pocket and top it with fresh spinach, avocado slices, or salsa for extra flavor. Because pita bread is sturdy yet soft, it keeps the eggs contained without falling apart, making it easy to eat on the go. This variation offers a balanced meal with protein, fiber, and healthy fats, giving you energy to start your day. You can even make several ahead of time and reheat them for meal-prepped breakfasts.
8. Sweet Dessert Pita Pocket
While savory versions are more common, pita pockets can also be transformed into a unique dessert. Start by spreading a layer of nut butter or chocolate spread inside the pita, then fill it with sliced fruits like bananas, strawberries, or apples. You can even sprinkle in some nuts, granola, or a drizzle of honey for added crunch and sweetness. The pita acts as a soft yet sturdy vessel for these dessert fillings.
Warm the filled pita briefly in a skillet or oven to soften the bread and slightly melt the chocolate or nut butter. The result is a warm, gooey, fruit-filled treat that tastes indulgent yet is easy to prepare. This variation is great for kids, dessert lovers, or anyone who wants to use pita bread creatively beyond savory dishes. It’s versatile enough to customize with your favorite sweet toppings, making it a crowd-pleaser every time.
Conclusion
Pita pockets are more than just bread—they are a versatile base for countless recipes that fit every taste, diet, and occasion. From savory fillings like chicken shawarma and falafel to lighter choices such as grilled vegetables or tuna salad, each recipe highlights how adaptable and delicious pita bread can be. Even sweet variations prove that pita is not limited to lunch or dinner but can satisfy cravings at any time of the day.
By mastering the basic pita bread preparation and then experimenting with different fillings, you open the door to endless meal possibilities. Whether you’re looking for quick lunches, hearty dinners, healthy vegetarian options, or even fun desserts, pita pockets deliver on flavor, convenience, and creativity. With these eight variations, you can enjoy pita bread in exciting new ways while catering to every preference in your household.