Flaky Danish Pastry Recipe: Authentic Step-by-Step Guide for Perfect Butter-Layered Pastries
A Danish pastry is a laminated yeast-enriched pastry known for its multiple thin layers of dough and butter, which bake into a delicate, crisp, and tender texture. This article provides a complete, human-written recipe with precise ingredient quantities, detailed technique notes, and step-by-step instructions to help both beginners and experienced bakers.
You will learn why temperature control and resting times matter, how to prepare a butter block, and how many turns to perform. By the end of this guide you can produce bakery-quality Danish pastries at home with consistent results.

Also try: Brownies from Scratch With Cocoa Powder
What is a Danish Pastry?
A Danish pastry is a laminated pastry made from a yeast-leavened, enriched dough that encases layers of butter. Lamination is the technique of folding and rolling a dough repeatedly around a butter block to create many alternating layers. When baked, steam generated by the butter separates the layers and produces the characteristic flaky structure.
Danish differs from puff pastry because the dough contains yeast and enrichment such as eggs and milk, which affect flavor and texture. This pastry family includes shapes and styles from simple turnovers to elaborate crowns and spirals.

Also try: Banana Pudding
Main Nutritional Highlights
Danish pastries are calorie-dense due to a high proportion of butter and refined flour, making them an occasional indulgence. A single medium Danish supplies a substantial amount of fat, including saturated fat, along with carbohydrates and moderate protein.
Milk and eggs in the dough contribute small amounts of calcium and essential amino acids, while fruit fillings can add vitamins and fiber. Because of the concentrated energy, portion control and pairing with protein or fiber-rich foods can make them part of a balanced meal. If you seek to reduce calories, consider smaller portions, lighter fillings, or intermittent enjoyment rather than daily consumption.

Yield and Total Quantity
This recipe yields twelve medium Danish pastries, each approximately 120 to 160 grams, depending on filling and glaze. Total finished batch weight typically ranges between 1.5 and 1.8 kilograms when including fillings and glaze. If you prefer smaller pastries, the recipe can be divided to make twenty-four bite-sized pieces with reduced bake time.
The instructions below include exact gram measurements and practical notes to help you scale the recipe up or down reliably. Baking times and proofing durations assume a standard home oven and moderate kitchen temperatures.

Main Ingredients (with quantities and explanations)
Below are precise ingredient quantities for the dough, butter block, fillings, and finishing components needed for twelve medium pastries. All measurements are given in grams and familiar kitchen measures to make the recipe reproducible in any kitchen.
Quality of ingredients especially butter and flour significantly affects the final result, so choose high-quality options where possible. Keep cold ingredients chilled and measure accurately with a kitchen scale for consistent lamination and rise. Use unsalted butter to control overall salt levels unless you prefer a savory note from salted butter.
For the Dough (Final Dough makes about 1.2 kg)
- 500 g all-purpose flour (approximately 4 cups, lightly spooned and leveled). Flour provides structure; a protein content around 10 to 11 percent balances strength and tenderness.
- 60 g granulated sugar (about 4 tablespoons). Sugar adds light sweetness, helps tenderize, and feeds yeast during fermentation.
- 10 g fine sea salt (about 2 teaspoons). Salt regulates yeast activity and enhances flavor.
- 10 g instant dry yeast (about 1 tablespoon). Instant yeast mixes directly into the dough and gives consistent fermentation.
- 240 ml whole milk, lukewarm (about 1 cup). Milk enriches the dough and contributes to a tender crumb; lukewarm temperature helps activate yeast.
- 2 large eggs (about 100 g total), room temperature. Eggs add richness, color, and structural stability.
- 60 g unsalted butter, softened but cool (about 4 tablespoons). This butter is incorporated into the dough for tenderness; additional butter is reserved for lamination.
For the Butter Block (Lamination)
- 350 g unsalted butter (cold, about 1.5 cups by weight). Use high-fat European-style butter if available; it improves flavor and laminating quality.
Keep the butter cold but pliable; it should be about the same temperature as the dough when you enclose it to prevent tearing or streaking.
For Pastry Cream Filling (about 500 g)
- 500 ml whole milk (about 2 cups).
- 100 g granulated sugar (1/2 cup).
- 3 large egg yolks (about 60 g).
- 35 g cornstarch (about 1/4 cup plus 2 teaspoons) as a thickener.
- 35 g unsalted butter (approx. 2.5 tablespoons) to enrich the custard.
- 1 teaspoon pure vanilla extract for flavor.
Pastry cream yields a smooth, stable custard excellent for classic cheese and fruit-filled Danishes.
For Almond Filling (optional)
- 150 g almond paste or marzipan, crumbled and softened.
- 40 g unsalted butter, softened.
- 30 g powdered sugar.
- 1/2 teaspoon almond extract.
This filling produces a rich, nutty center reminiscent of frangipane and pairs beautifully with sliced almonds.
For the Glaze
- 200 g powdered sugar (about 1 2/3 cups).
- 2 to 3 tablespoons milk, lemon juice, or a mix to reach a shiny, pourable consistency.
- 1/2 teaspoon vanilla extract (optional).
A light glaze highlights the pastry without masking the buttery layers.
Other Fillings and Toppings (suggested quantities)
- 200 to 300 g fruit preserves such as apricot, raspberry, or blueberry.
- 200 g cream cheese softened and mixed with 50 g powdered sugar for a cream cheese filling.
- 50 g sliced almonds for topping.
- 1 whole egg beaten with 1 tablespoon water for an egg wash.
Pantry Notes: Use unsalted butter for better salt control. If using salted butter, reduce added dough salt. Keep butter and dough chilled during lamination and rest times.
How to Prepare

1. Mix the Dough
Warm the milk to approximately 30 to 35 degrees Celsius so it is lukewarm, not hot. In the bowl of a stand mixer fitted with a dough hook, combine the flour, sugar, salt, and instant yeast and mix briefly to distribute. Add the lukewarm milk and whole eggs and mix on low speed until ingredients come together into a shaggy mass. Add the 60 g softened butter in pieces and knead on medium-low for 6 to 8 minutes until the dough is smooth and slightly elastic. The dough should pass the windowpane test lightly and be tacky but not sticky.
2. First Rest and Chill
Shape the dough into a flat rectangle, wrap it tightly in plastic wrap, and chill in the refrigerator for at least 30 minutes. Chilling relaxes the gluten and firms the dough making it easier to roll and less likely to tear when encasing the butter. Short rests between handling steps prevent the butter block from melting and preserve distinct layers. If your kitchen is warm, increase chill times to keep dough and butter similar in temperature. While the dough chills, prepare the butter block on a lightly floured or parchment-lined surface.
3. Prepare the Butter Block
Place the 350 g cold butter between two sheets of parchment and pound gently with a rolling pin to soften slightly, then roll into an even rectangle roughly 20 by 25 cm and about 8 to 10 mm thick. Aim for uniform thickness so when the butter is encased it will distribute evenly with each fold. If the butter becomes too soft, chill briefly until firm but still pliable; too cold butter can break into chunks and too warm butter will smear into the dough. Keep the butter chilled until ready to encase and ensure both butter and dough are at similar temperatures for successful lamination.
4. Enclose the Butter and Begin Laminating
Roll the chilled dough into a rectangle about 30 by 40 cm on a lightly floured surface. Place the butter block in the middle, offset so that when the dough is folded like a letter the butter stays enclosed. Fold the bottom third up over the butter and the top third down to meet it, sealing the edges by pressing lightly. Rotate the dough 90 degrees so the seam is to your left or right and roll gently into a long rectangle about 30 by 60 cm for the first letter fold. Perform a single letter fold (three layers) and then wrap and chill for 30 minutes to keep butter firm.
5. Complete the Lamination with Additional Turns
Repeat the rolling, folding, and chilling process two more times for a total of three single letter folds, chilling for 20 to 30 minutes between each fold. Some bakers perform a combination of single and double folds; for Danish pastry, three to four single letter folds creates ample layers without overheating the butter. Be patient and keep the dough moving between chilling and folding; the cumulative folds create dozens of delicate layers. After the final fold chill the dough for at least one hour or overnight for best flavor and manageability.
6. Rolling Out and Shaping
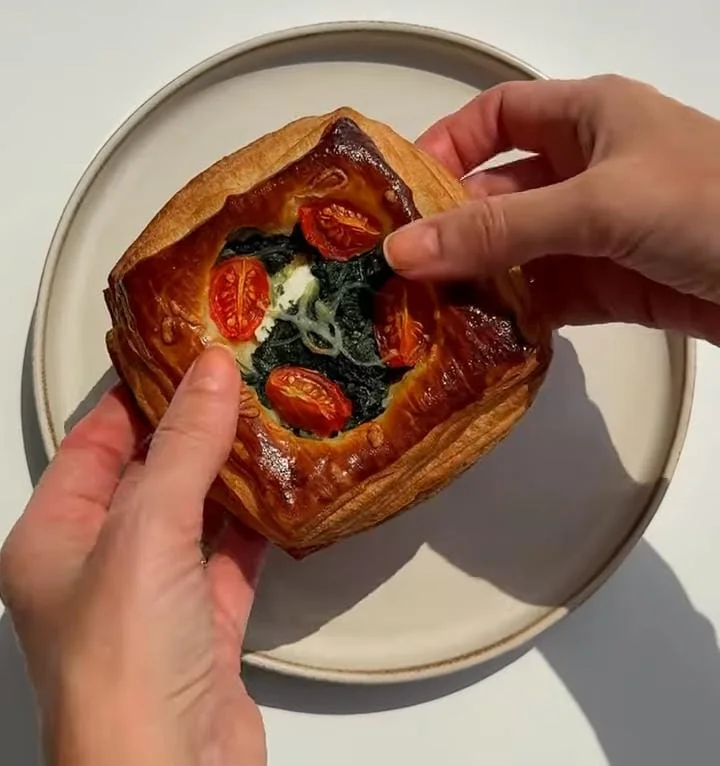
After the final rest, roll the laminated dough to approximately 4 mm thickness on a lightly floured surface. Cut the dough into twelve rectangles of about 12 by 10 cm for medium pastries. To shape a classic square Danish with a center well, fold the corners toward the center and press lightly, leaving a small well for fillings. For spirals and twists, roll rectangles into tight logs and slice or perform braid techniques described below. Keep scraps chilled and re-roll them gently; avoid excessive reworking which reduces layer lift.
7. Fill, Proof, and Egg Wash
Arrange shaped pastries on parchment-lined baking sheets leaving space for expansion. Pipe or spoon 1 to 2 tablespoons of pastry cream or a tablespoon of preserves into the center wells. Brush exposed dough with beaten egg wash for glossy color and to aid browning. Proof the pastries at cool room temperature (around 20 to 22 degrees Celsius) for 60 to 90 minutes until puffy and slightly risen but not overproofed. Overproofed pastry will collapse and lose crisp lamination, so monitor rise rather than strict timing.
8. Baking
Preheat oven to 200 degrees Celsius (about 390 degrees Fahrenheit). Bake medium-sized Danishes for 12 to 16 minutes on the middle rack, rotating sheets halfway through for even browning. Look for a deep golden color, visible separation of layers, and fully set centers. If adding sliced almonds or sugar toppings, add them after the first 8 minutes to avoid burning. If pastries are browning too quickly, lower temperature by 10 to 15 degrees and extend bake time slightly.
9. Glazing and Finishing
Allow pastries to cool slightly on wire racks before glazing so the glaze does not run off entirely. Whisk powdered sugar with milk or lemon juice to a pourable consistency and drizzle or dip the pastry tops. For a professional shine, warm apricot jam and brush lightly on warm pastries; this creates a glossy finish and seals in moisture. Sprinkle toasted almonds or a dusting of powdered sugar after glazing for presentation. Serve warm for best texture; if storing, re-crisp pastries briefly in a hot oven before serving.
Tips for Best Texture and Flavor
Maintain cold temperatures during lamination to prevent butter from merging into the dough and losing distinct layers. Use European-style butter with higher fat percentage for better flavor and lamination behavior. Rest between folds to allow the gluten to relax and keep dough workable. Roll gently and evenly to maintain uniform layer thickness; uneven rolling causes irregular puffing. Do not overproof; watch for puffiness rather than relying strictly on time.
Healthy Habits and Mindful Enjoyment

While Danish pastries are a delightful treat, they are best enjoyed in moderation due to their richness. Balance a serving with protein such as a boiled egg or Greek yogurt and fresh fruit to slow sugar absorption.
Share pastries with others at gatherings to enjoy variety without excess. Consider smaller portion sizes or making miniature versions if you want to indulge more frequently. If reducing sugar, choose fruit fillings without added sugar and skip the full glaze; texture will remain the highlight.
Storage, Freezing, and Reheating
Store baked, unglazed pastries at room temperature in an airtight container for up to two days to preserve crispness. For longer storage, freeze unglazed pastries on a baking sheet until firm and then transfer to a freezer bag for up to one month.
Reheat frozen pastries at 175 degrees Celsius for 8 to 12 minutes to restore crispness. If freezing unbaked pastries, bake from frozen and add a few minutes to baking time to ensure layers set properly. Avoid refrigeration for long-term storage as it accelerates staling and softens layers.
Variations
Variation 1 — Classic Cheese Danish
Create a cream-cheese filling by blending 200 g cream cheese with 50 g powdered sugar, one egg yolk, and one teaspoon vanilla until smooth. Pipe one to two tablespoons of this filling into the center of each shaped pastry before proofing. The tangy cream cheese contrasts beautifully with the buttery layers, providing a creamy focal point in each bite. Top with a light sugar glaze after baking to add shine and a balanced sweetness. This classic variation is a reliable favorite for home bakers and coffee shops alike.
Add a small spoonful of fruit preserves or a smear of lemon curd on top of the cream cheese for a bright accent. Almond flakes make a pleasant textural contrast when sprinkled before baking. If you prefer a lighter filling, replace half the cream cheese with ricotta for a softer mouthfeel. Serve slightly warm so the filling remains creamy and the layers offer a satisfying crunch. This version adapts well to seasonal fruit pairings and is ideal for brunch menus.
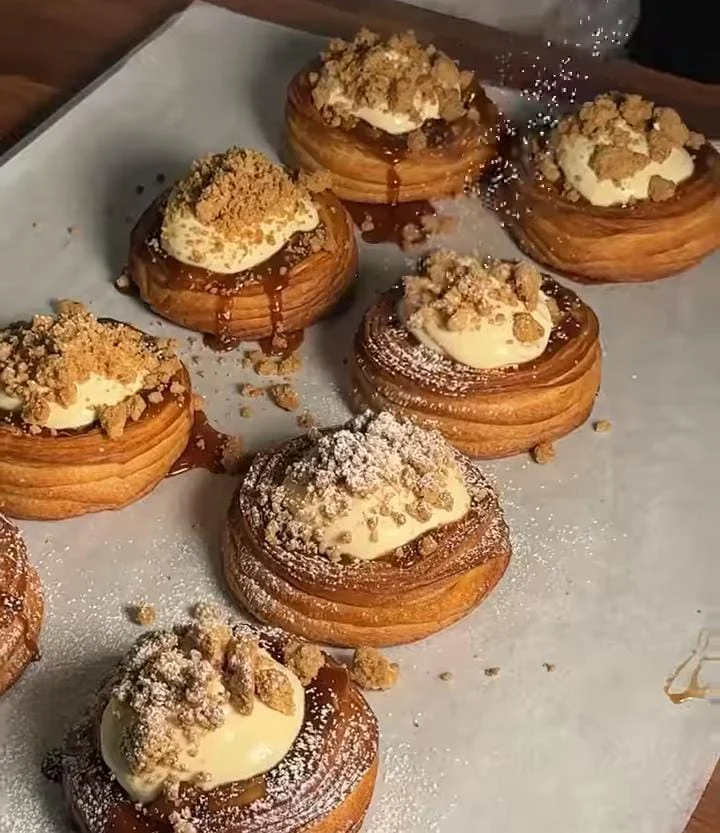
Variation 2 — Almond Crown Danish

Roll out almond paste with a little softened butter and spread a thin layer across the dough center before folding into a crown shape. Fold the corners over to form a decorative crown and press gently to seal the filling. Top with sliced almonds and a sprinkle of sugar to create a toasty, crunchy finish. Bake until the almond paste becomes molten and fragrant, creating a luxurious, nutty center. The aroma of toasted almonds elevates the pastry into a sophisticated bakery item.
Brush warm apricot jam over the finished crowns for a glossy sheen that looks professional and appealing. Powdered sugar dusting adds a final touch and contrasts the golden crumb. This variation freezes and reheats particularly well, making it suitable for make-ahead gifting. For holiday presentations, top with chopped pistachios or edible flowers for color. Almond crowns are a favored option for special occasions and afternoon teas.
Variation 3 — Fruit-Filled Danish (Apricot or Berry)
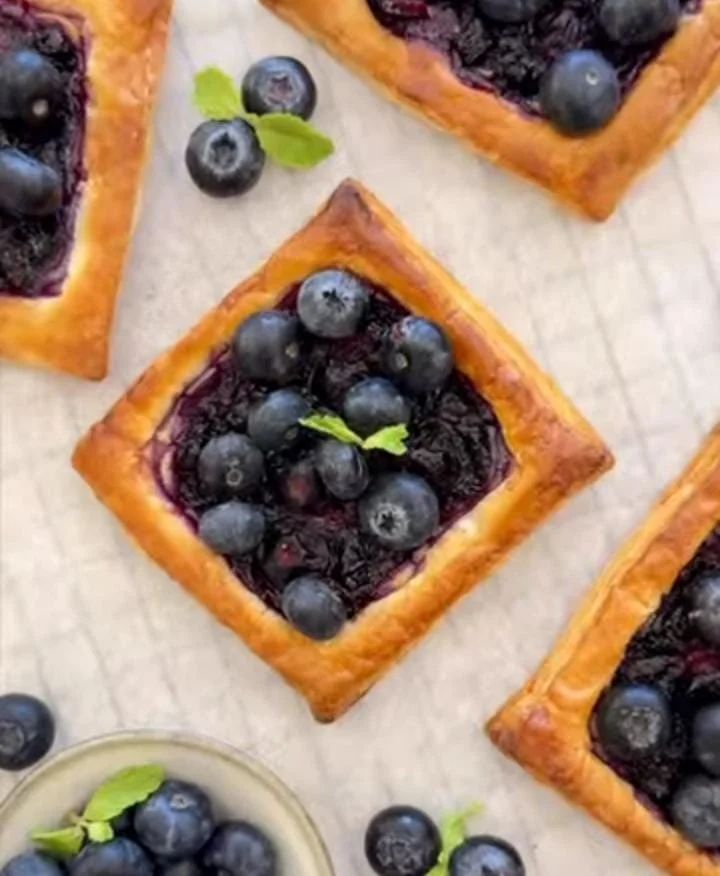
Spoon high-quality preserves or macerated fresh berries into pastry wells, blending with a teaspoon of cornstarch when using fresh fruit. The fruit should be slightly reduced and thickened so it does not weep excessively during baking. Bake until the fruit is bubbling and pastry edges are deeply golden for a jammy, vibrant center. A small squeeze of lemon juice brightens fruit flavors and balances the pastry’s richness. This version highlights seasonal produce and offers a lighter, refreshing option.
For presentation, garnish baked fruit Danishes with a thin slice of fresh fruit or a sprig of mint to emphasize freshness. A shy pastry glaze complements the fruit without overpowering its natural taste. Citrus zest in the glaze adds an aromatic lift that pairs nicely with berry or stone fruit fillings. These fruit-filled pastries are crowd-pleasers for brunch tables and casual celebrations. They pair wonderfully with a cup of lightly brewed tea or a bright coffee.
Variation 4 — Savory Cheese and Herb Danish
Combine ricotta or cream cheese with grated cheddar, chopped herbs like chives and parsley, and a pinch of salt for a savory filling. Spoon the mixture into shaped pastries and top with sesame seeds or a dusting of grated Parmesan. The savory profile transforms the pastry from a sweet treat into a brunch-worthy savory item. Serve warm as part of a savory buffet or alongside soups and salads for a satisfying meal component. This savory version showcases how laminated dough can be adapted beyond desserts.
Add cooked bacon, sautéed mushrooms, or caramelized onions to the filling for depth and umami, adjusting salt to taste. A final sprinkle of coarse salt after baking enhances contrast and flavor for the savory profile. Serve with a simple dressed green salad to balance richness and provide freshness. Savory Danishes are popular at catered events and pair well with sparkling beverages for brunch. They are also ideal for using leftover roasted vegetables in a creative way.
Troubleshooting Common Issues
If butter leaks during laminating, the butter and dough were not at similar temperatures; ensure both are cool and firm. If layers are dull or dense, check that you performed sufficient folds and that the dough rested between turns.
A collapsed pastry after proofing often indicates overproofing; reduce proofing time or proof at a lower temperature. If the interior is doughy after baking, increase bake time slightly and ensure your oven heats evenly. If pastries stick to the rolling surface, lightly flour the surface or use parchment but avoid excess flour which can toughen outer layers.
Equipment and Tools You Need
A stand mixer with a dough hook speeds kneading but you can knead by hand with patience. A rolling pin, pastry brush, sharp bench scraper, and measuring scale are essential for accurate lamination. Parchment paper, baking sheets, and a reliable oven thermometer improve consistency. Chilling space such as a refrigerator and a flat surface for rolling out the dough are necessary. Small piping bags and pastry tips are optional but helpful for neat filling distribution.
Final Serving Suggestions and Pairings
Serve Danishes warm with coffee, tea, or a small bowl of yogurt to add protein and contrast. For brunch, present a variety of fillings to accommodate different tastes and dietary needs. Garnish with fresh fruit or citrus zest to add bright aromas and a seasonal touch. When serving at gatherings, arrange pastries on wooden boards or tiered stands for an inviting presentation. Offer smaller portions to enable guests to sample multiple flavors without excess.
Closing Thoughts
Mastering Danish pastry requires patience and attention to temperature control, but the reward is a versatile pastry that elevates mornings and special occasions. Practice laminating in small batches to build confidence and adjust techniques to your specific kitchen environment.
Use fresh, high-quality butter and ingredients to enhance flavor because little else in the recipe competes with the butter’s taste. Document your process and note times and temperatures that worked well for your oven and climate. With practice you will produce consistent, beautiful Danishes worthy of sharing with family and friends.
Advanced Techniques and Flavor Enhancements
For bakers seeking to elevate their Danish pastry, a few precise techniques make a noticeable difference. Blend a small portion of bread flour with all-purpose flour to increase dough strength while retaining tenderness. Use an overnight cold fermentation before lamination to deepen flavor and improve dough handling during rolling. Chill the dough between folds consistently so the butter remains firm yet malleable and does not smear.
Finish with a light apricot or fruit glaze rather than thick icing to preserve the butter’s delicate flavor notes. Practice steady rolling pressure and uniform folding rhythm to produce predictable layers and reliable oven spring every batch. Small increases in hydration and careful proofing adjustments can yield even lighter layers, though these changes require practice. and patience too.


